
Automating the Response to a Security Alert with Bicep (Microsoft Sentinel)
When a security analyst is asleep and a brute-force sign-in attempt fires at 3 a.m., the difference between a contained incident and a breach is often just a few minutes. Instead of relying on someone to notice an alert and react manually, you can wire the reaction directly into your infrastructure-as-code: the moment a specific alert fires, Azure runs a playbook that takes action automatically — no human in the loop required for the first response.
This article walks through building that pipeline entirely in Bicep, using Microsoft Sentinel (Azure's SIEM) as the alerting engine and a Logic Apps playbook as the automated responder.
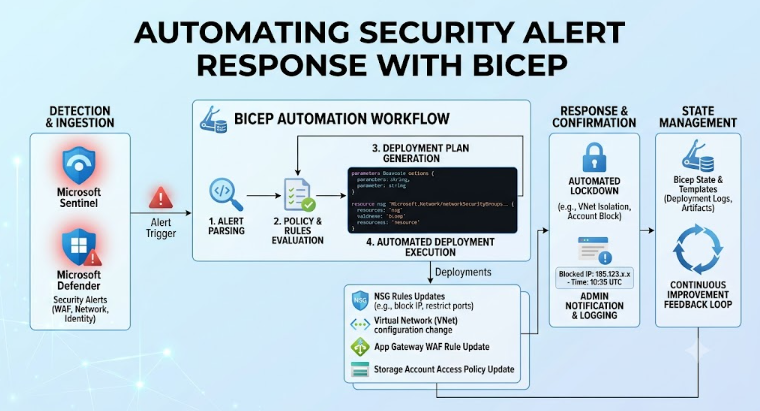
The architecture
Three pieces work together:
- Analytics rule — the detection logic that scans logs and raises an incident when a specific pattern is found (for example, repeated failed sign-ins from the same account).
- Automation rule — a Sentinel resource that watches for incidents matching a condition (e.g. "created by this specific analytics rule") and triggers an action.
- Logic App playbook — the actual responder. It receives the incident and performs the remediation, such as disabling the user account, blocking an IP address, or isolating a device.
Analytics Rule ──► Incident created ──► Automation Rule (condition match) ──► Logic App Playbook ──► Remediation action
All three can be defined and deployed as code with Bicep, so the entire response pipeline lives in source control alongside the rest of your infrastructure.
Prerequisites
- A Log Analytics workspace with Microsoft Sentinel enabled
- Bicep CLI / Azure CLI (
az bicepor thebicepbinary) installed - Contributor access on the resource group, and permission to create role assignments if the playbook needs to call other Azure APIs (e.g. Microsoft Graph, Azure AD)
- The playbook's connectors (e.g. Azure Sentinel connector, Office 365, Microsoft Graph) authorized after first deployment — API connections in Logic Apps typically require a one-time manual consent step
Step 1 — The Logic App playbook
The playbook must start with the Microsoft Sentinel trigger (Microsoft Sentinel alert / incident trigger). Below is a minimal playbook that receives an incident and, as an example action, posts a Teams/email notification — you would replace the final action with your actual remediation step (disable account, block IP, isolate machine, etc.).
param location string = resourceGroup().location
param playbookName string = 'pb-respond-bruteforce'
param sentinelConnectionName string = 'azuresentinel-connection'
resource sentinelConnection 'Microsoft.Web/connections@2016-06-01' = {
name: sentinelConnectionName
location: location
properties: {
displayName: sentinelConnectionName
api: {
id: subscriptionResourceId('Microsoft.Web/locations/managedApis', location, 'azuresentinel')
}
}
}
resource playbook 'Microsoft.Logic/workflows@2019-05-01' = {
name: playbookName
location: location
identity: {
type: 'SystemAssigned'
}
properties: {
state: 'Enabled'
definition: {
'$schema': 'https://schema.management.azure.com/providers/Microsoft.Logic/schemas/2016-06-01/workflowdefinition.json#'
contentVersion: '1.0.0.0'
triggers: {
Microsoft_Sentinel_incident: {
type: 'ApiConnectionWebhook'
inputs: {
host: {
connection: {
name: '@parameters(\'$connections\')[\'azuresentinel\'][\'connectionId\']'
}
}
body: {
callback_url: '@{listCallbackUrl()}'
}
path: '/incident-creation'
}
}
}
actions: {
// Replace this with the real remediation step, e.g.:
// - HTTP call to Microsoft Graph to disable the user
// - Azure Firewall / NSG rule update to block the source IP
// - Defender for Endpoint "isolate machine" action
Notify_Team: {
type: 'Http'
inputs: {
method: 'POST'
uri: 'https://YOUR-NOTIFICATION-WEBHOOK'
body: {
text: 'Security alert triggered automated response: @{triggerBody()?[\'object\']?[\'properties\']?[\'title\']}'
}
}
runAfter: {}
}
}
}
parameters: {
'$connections': {
value: {
azuresentinel: {
connectionId: sentinelConnection.id
connectionName: sentinelConnectionName
id: subscriptionResourceId('Microsoft.Web/locations/managedApis', location, 'azuresentinel')
}
}
}
}
}
}
output playbookId string = playbook.id
Note: After deployment, the Sentinel API connection needs a one-time interactive authorization in the portal (Resource → API connections → Authorize), since Logic Apps connectors can't complete OAuth consent unattended during a Bicep deployme
Step 2 — The automation rule
The automation rule is what actually ties a specific alert to the playbook. The key piece is the triggeringLogic.conditions block, where you filter on the analytics rule that produced the incident (using IncidentRelatedAnalyticRuleIds), and the actions block, where actionType: 'RunPlaybook' points at the Logic App's resource ID.
param workspaceName string
param analyticRuleId string // resourceId of the specific alert/analytics rule to react to
param automationRuleName string = guid('auto-rule-bruteforce')
resource workspace 'Microsoft.OperationalInsights/workspaces@2022-10-01' existing = {
name: workspaceName
}
resource automationRule 'Microsoft.SecurityInsights/automationRules@2023-02-01-preview' = {
name: automationRuleName
scope: workspace
properties: {
displayName: 'Auto-respond to brute-force alert'
order: 1
triggeringLogic: {
isEnabled: true
triggersOn: 'Incidents'
triggersWhen: 'Created'
conditions: [
{
conditionType: 'Property'
conditionProperties: {
propertyName: 'IncidentRelatedAnalyticRuleIds'
operator: 'Contains'
propertyValues: [
analyticRuleId
]
}
}
]
}
actions: [
{
order: 1
actionType: 'RunPlaybook'
actionConfiguration: {
logicAppResourceId: playbook.id
tenantId: tenant().tenantId
}
}
]
}
}
analyticRuleId is the resource ID of the analytics rule you want to react to for example, one that flags brute-force sign-ins. You get this from an existing rule (Microsoft.SecurityInsights/alertRules) or deploy one alongside this template.
Step 3 — Granting the playbook permission to act
If the remediation step calls Azure Resource Manager or Microsoft Graph (e.g. to disable a user, or update a network security group), the playbook's system-assigned managed identity needs a role assignment. For example, granting it rights to modify NSG rules.
resource nsgRoleAssignment 'Microsoft.Authorization/roleAssignments@2022-04-01' = {
name: guid(playbook.id, 'Network Contributor')
scope: resourceGroup()
properties: {
principalId: playbook.identity.principalId
roleDefinitionId: subscriptionResourceId(
'Microsoft.Authorization/roleDefinitions',
'4d97b98b-1d4f-4787-a291-c67834d212e7' // Network Contributor
)
principalType: 'ServicePrincipal'
}
}
Also, Sentinel itself needs permission to run the playbook that's handled by an existing built-in role, Microsoft Sentinel Automation Contributor, assigned to the Sentinel automation identity on the playbook's resource group. This is normally granted the first time you link a playbook to an automation rule through the portal or API, for a fully code-driven pipeline, add it explicitly as a roleAssignments resource scoped to the playbook.
Step 4 — Deploying
--resource-group rg-security \
--template-file main.bicep \
--parameters workspaceName=my-sentinel-workspace analyticRuleId=/subscriptions/.../alertRules/xxxx
Step 5 — Testing safely
Before trusting this in production:
- Trigger the analytics rule in a test environment (e.g. simulate the failed sign-in pattern) and confirm the incident is created.
- Confirm the automation rule fires and the playbook run appears in the Logic App's Run history.
- Start the remediation action in "dry run" mode (log the intended action instead of executing it) until you're confident the condition logic only matches the alert you intend.
- Add a second condition on severity or entity type if the analytics rule is broad, to avoid over-triggering.
Key takeaways
Microsoft.SecurityInsights/automationRulesis the glue resource: it's what makes the response automatic rather than requiring an analyst to manually run a playbook from the incident.- The
RunPlaybookaction type just needs the Logic App's resource ID and tenant ID — the matching logic is entirely intriggeringLogic.conditions. - Keep the remediation logic in the Logic App itself, and keep the decision to respond in the automation rule's conditions — this makes it easy to reuse one playbook across several different alerts by attaching multiple automation rules to it.
- Because everything is Bicep, the whole detection-to-response pipeline can be versioned, reviewed, and deployed the same way as any other infrastructure change.


No comments yet. Be the first to share your thoughts!